
The Media tab
The Media tab is the project’s library: every file you’ve imported, whether a clip uses it or not. Come here to find a file, see what it is, put it on the timeline, or sort out one that has gone missing.
- Where
- Inspector ▸ MediaRight-click a row for its menu
- Agent tools
get_projectinsert_clipoverwrite_clipset_selectionrelink_mediaremove_media
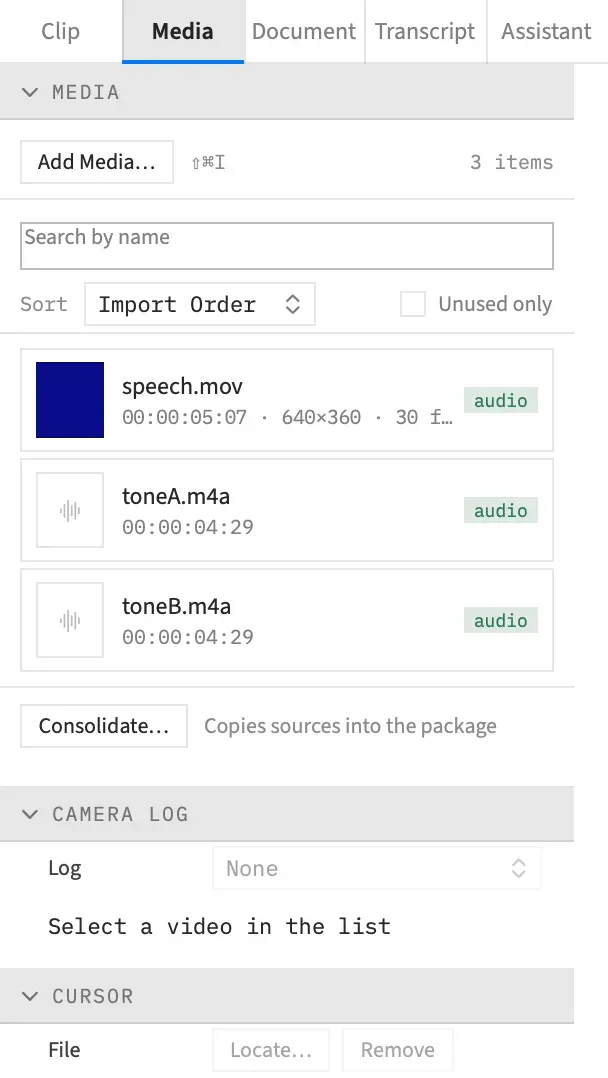
What the tab shows
Section titled “What the tab shows”A project points at your files where they are, and doesn’t copy them in. That’s why a row can be missing, and why the tab offers Relink… and Consolidate….
From top to bottom, the tab holds:
- The top bar: Add Media… (⇧⌘I) and the item count. See Import media. You can also drop files or a folder from the Finder onto the tab to add them.
- The find band: a search field, a sort and Unused only. With no media yet, this band isn’t there and the tab reads “Drop files here, or use Add Media….”
- The list: one row per file.
- The footer: Consolidate…, with the line “Copies sources into the package”. See Consolidate Media.
Three more sections sit under the list and work on the selected row:
| Section | Appears once the project has | See |
|---|---|---|
| Camera Log | A video file | Camera Log |
| HDR10 | An HDR10 (PQ) file | HDR10 peak |
| Cursor | A movie that has a picture, not only sound | Cursor files |
Read a row
Section titled “Read a row”Each row has a thumbnail, the file’s name, and a line of facts that depends on the kind of file.
| Kind | Thumbnail | The line reads |
|---|---|---|
| Movie | A frame from the movie | Duration, size and frame rate, such as 00:01:12:04 · 1920×1080 · 29.97 fps |
| Picture | The picture | Width × height and 30 fps, such as 3024×4032 · 30 fps |
| Sound | A waveform glyph | Duration |
| LUT | A cube glyph | LUT |
A file with no duration or size shows its kind instead. Thumbnails arrive a moment after an import, and until then a glyph stands in. A line too long for the row ends in an ellipsis, so widen the inspector to read the rest.
Badges
Section titled “Badges”Badges sit at the right of a row:
- audio, in green, marks a file with sound.
- missing, in coral, marks a file Frame Job can’t find. It’s always shown, however little room the row has, because the name and the line give way first. See Relink missing media.
The tooltip
Section titled “The tooltip”Hover over a row to see how to place it: “Drag to a timeline track, or onto the canvas. Hold ⌥ to insert, ⇧⌥ to overwrite.”
A LUT’s tooltip reads “A LUT: apply it to clips as a look.”
A file Frame Job made a movie copy of, such as a WebM or MKV or a conversion with ffmpeg, has one more line above that. It gives the original’s path and where the copy lives: Frame Job’s Rewrapped folder, or this project’s package once you’ve consolidated.
Find a file
Section titled “Find a file”Search by name
Section titled “Search by name”Type in Search by name and the list narrows as you type. It ignores case and accents, as the Finder does, so “resume” finds “Résumé.mov”. Every character you type counts, including a space. Press ⎋ to clear the field.
If nothing matches, or nothing is left once Unused only is on too, the tab reads “No media matches the search or the filter.”
The Sort popup puts the list in one of four orders. The default is Import Order.
| Sort | Order |
|---|---|
| Import Order | The order the files were added. |
| Name | Alphabetical, the way the Finder sorts, so clip2 comes before clip10. |
| Duration | Shortest first. Pictures and LUTs have no duration, so they come first. |
| Kind | Audio, Image, LUT, then Video. |
Every order is ascending, and files that tie stay in import order.
Unused only
Section titled “Unused only”Tick Unused only to show only the files no clip uses. It’s a quick way to see what you could remove before you hand a project on.
- A file used only inside a nest counts as used.
- A LUT counts as used when it’s a clip’s look or a file’s Camera Log. A LUT used only as the look at the end of an action counts as unused.
The item count
Section titled “The item count”The top bar counts the files, and how many are showing while the list is narrowed:
| Count | Means |
|---|---|
| No media | The project has no files. |
| 1 item, 12 items | Every file is showing. |
| 3 of 12 items | A search or Unused only is hiding the rest. |
The search, the sort and Unused only belong to the window. They aren’t saved with the project, and each open project has its own. They do survive an import, so a search stays on while you add more files.
Select a row
Section titled “Select a row”Click a row to select it. The row gets an outline in the accent colour, and it becomes the file these work on:
- Edit ▸ Insert at Playhead and Edit ▸ Overwrite at Playhead, which stay off until a row other than a LUT is selected. See Add clips to the timeline.
- The Camera Log, HDR10 and Cursor sections under the list.
Selecting a row isn’t an edit. It adds no undo step and doesn’t mark the project as changed. If a search or Unused only hides the selected row, the row is deselected, so you can’t place a file you can’t see.
The row’s menu
Section titled “The row’s menu”Right-click a row for its menu. It acts on the row you clicked, whatever the selected row is.
| Item | What it does |
|---|---|
| Insert at Playhead | Places the file at the playhead and makes room for it. Off for a LUT. |
| Overwrite at Playhead | Places the file at the playhead and takes the room it needs. Off for a LUT. |
| Reveal in Timeline | Selects the clips showing this file. See below. |
| Reveal in Finder | Shows the file in the Finder. See below. |
| Relink… | Points this row at another file. See Relink one file. |
| Remove | Takes the file out of the project. See Remove media. |
Insert at Playhead and Overwrite at Playhead also select the row. They use the same track as the Edit menu’s items, the selected clip’s track or else the front track, and Add clips to the timeline has the rest. A LUT is never placed, because it’s applied as a look. A LUT row doesn’t drag either.
Reveal in Timeline
Section titled “Reveal in Timeline”Reveal in Timeline shows you where you used a file. It selects every clip showing the file and scrolls to the earliest one. If that changes the selection, the inspector switches to the Clip tab. For a LUT, it selects the clips whose look it is.
The item is off when nothing in the timeline itself uses the file, and that includes a file whose only clips are inside a nest. Open the nest with ⌘↓ first: the command looks at whatever’s open, so it then finds the clips in there.
Revealing clips changes the selection, not the project. It adds no undo step.
Reveal in Finder
Section titled “Reveal in Finder”Reveal in Finder shows the file in the Finder. For a WebM, an MKV or another file Frame Job made a copy of, it shows the original, or the copy when the original has gone. With neither on disk, it beeps.