
Normalize
Normalize sets each selected clip’s volume from a measurement of the clip, so you don’t have to set levels by ear. In its default Loudness mode, every clip lands at the same loudness, which is how you make clips match.
- Menu
- Clip ▸ Normalize
- Where
- Clip tab ▸ Sound ▸ Volume
- Agent tools
normalize_clip
Normalize a clip
Section titled “Normalize a clip”-
Select one or more clips.
-
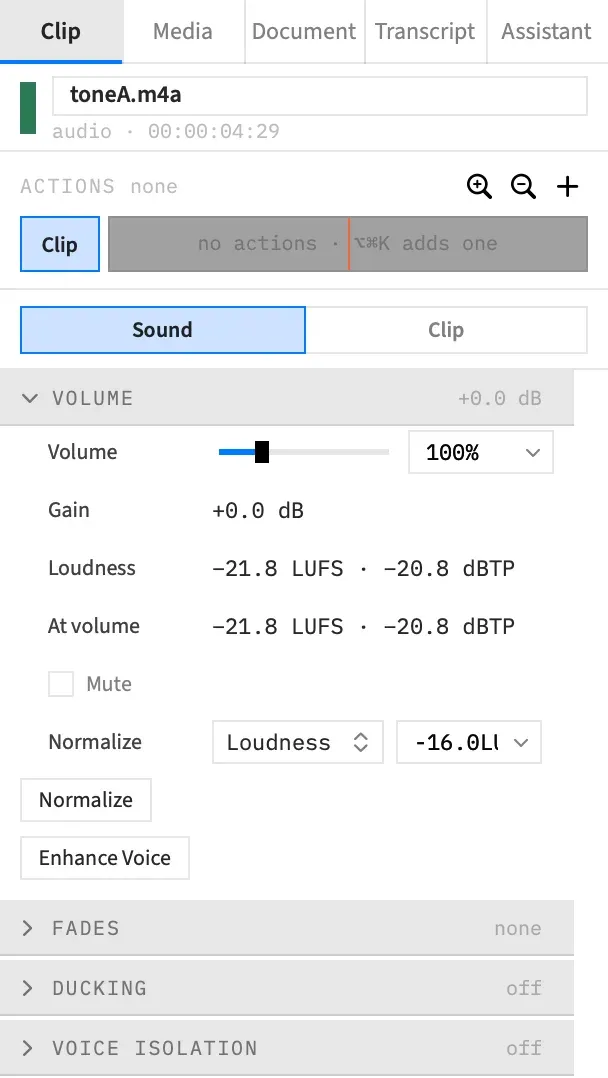
On the Sound sub-tab, open the Volume section and check the Normalize row: the mode, and in Loudness mode the target.
-
Press Normalize, or choose Clip ▸ Normalize. The two do the same thing and follow that row. There’s no keyboard shortcut.
However many clips are selected, it’s one undo step, named “Normalize”. That step also takes back any limiter it turned on.
It replaces the clip’s volume rather than adding to it, so pressing it a second time changes nothing, and that second press beeps. Mute is left as it is.
Choose a mode
Section titled “Choose a mode”The first control in the Normalize row picks what Normalize aims at.
| Mode | What it aims at | Matches clips? |
|---|---|---|
| Peak | Each clip’s loudest moment reaches −1 dBFS. | No |
| Loudness | Each clip’s overall loudness reaches the target, −16 LUFS unless you choose another. This is the default. | Yes |
The mode and the target belong to the app, not the project. They’re kept between launches, and changing them isn’t an undo step.
Set the loudness target
Section titled “Set the loudness target”The field beside the mode sets the level in LUFS, from −50 to −5. The default is −16, and it’s only live in Loudness mode. The quick picks are:
| Target | What it’s for |
|---|---|
| −14 LUFS | YouTube’s playback reference |
| −16 LUFS | The default |
| −23 LUFS | The EBU R 128 broadcast level |
Enhance Voice aims at the same target, and the Loudness Meter draws it as a line.
Loudness mode
Section titled “Loudness mode”Loudness mode sets each clip’s volume so its integrated loudness reaches the target. That’s the BS.1770 measure of the clip as a whole, as the export plays it, in LUFS, the unit of loudness. The volume can go down as well as up.
- It watches the peaks. A clip whose true peak would pass −1 dBTP at that volume gets its Limiter turned on at −1 dBTP in the same step, and the volume is the one that reaches the target through the limiter.
- It keeps a limiter you set. A clip that already has one keeps it, with its ceiling lowered to −1 dBTP if it was higher.
- It stops at 3200 %. A clip that would need more stops there and lands quieter than the target.
Peak mode
Section titled “Peak mode”Peak mode sets each clip’s volume so its loudest moment reaches −1 dBFS. The level is fixed, and it happens at once, with no sheet. It reads the file’s waveform, so the clip’s EQ, clean-up and other processing don’t count.
Each clip gets its own gain, so levels don’t match across a selection: a sparse voice still sounds quieter than a dense one. A clip whose peak is quieter than about −31 dBFS can’t reach −1 dBFS. It’s turned up to 3200 % and stops there.
What Normalize measures
Section titled “What Normalize measures”Normalize measures the clip, not the mix. It reads the clip’s waveform (Peak) or loudness analysis (Loudness) over the part of the file that actually plays, so a trimmed clip is measured on what’s left.
The clip’s volume, fades, ducking, mute and solo don’t affect the reading, and neither do its track’s volume and pan. In Loudness mode, the clip’s own Channels, Mix to mono and Pan do count on a stereo clip. A mono clip is measured on both channels, as the export plays it, which reads 3 dB louder than the file on its own.
Measure through a clip’s processing
Section titled “Measure through a clip’s processing”Cleaning up a clip changes how loud it measures, so the analysis alone would miss the target. In Loudness mode, a clip with any of these is rendered through them as the export plays it, and its volume is set from what comes out:
- An active EQ
- Hum removal
- Voice isolation
- Noise reduction
- A gate
- The leveller
- A de-esser
- A compressor
- A voice effect
With the limiter on as well, Normalize renders again at the volume it chose, and adjusts until the result is within 0.1 LU of the target, at most three times. A clip measured this way keeps its volume when the new one is within 0.05 dB of it and its limiter hasn’t changed, so a second press still changes nothing.
This takes a moment per clip, seconds on a long one, and the first press waits for the clip’s voice isolation or voice effect to render. A clip with none of this processing is measured from the analysis at once.
Until Normalize or Enhance Voice has measured such a clip, the At volume readout shows “≈” in front of its figures, because they’re from before the processing. See Clip volume.
The Measuring Sound sheet
Section titled “The Measuring Sound sheet”While clips are rendered through their processing, a Measuring Sound sheet shows a progress bar and “Clip 1 of 2…”, counting only the clips that need a render. Editing commands are off until it closes. Enhance Voice and Match Audio use the same sheet.
Nothing changes until every clip is measured, and Cancel leaves everything as it is. If the project changes while it measures, nothing changes, Frame Job beeps, and a sentence at the foot of the inspector says to choose the command again.
Clips Normalize skips
Section titled “Clips Normalize skips”Normalize leaves out the clips below and still does the rest. The button and the menu item are greyed out when no selected clip plays sound, or when only nests are selected. A press that changes nothing beeps, and neither the button nor the menu says which clips were skipped or why.
| Skipped | Why | Mode |
|---|---|---|
| Nests | Their level lives in the clips inside them. Open the nest and normalize those, or set the nest clip’s volume by hand. | Both |
| Shapes, titles, stills and movies with no sound | There’s no sound to measure. A clip with its sound switched off counts too. | Both |
| A clip not analysed yet | Its waveform or loudness is still being worked out, which often happens straight after an import. The Loudness readout says “measuring…” meanwhile. | Both |
| A silent clip | It’s silent over the part that plays. In Loudness mode that means quieter than −70 LUFS throughout. | Both |
| A very short clip | It plays for under 0.4 s, too short for a loudness measurement. | Loudness |
| A clip whose reversed copy is still being made | It can’t be rendered yet. | Loudness, through processing |
| A clip whose processing can’t be rendered | There’s nothing to measure. | Loudness, through processing |
| A clip that’s too quiet after its processing | It’s quieter than −70 LUFS after it. | Loudness, through processing |
Good to know
Section titled “Good to know”- Normalize writes the clip’s base level, even with the playhead inside an action. With an action selected, the button carries a small boxed “clip” tag to show this. If an action animates the volume, its values still win for as long as it runs.
- It can go past the slider’s 400 %, up to the 3200 % ceiling, about +30 dB.
- The result for a limited clip with no other processing is worked out from the analysis, not rendered, so the export can land slightly off it.
- A clip played at a speed other than ×1, or ramped, reads to within about 0.5 LU of what plays. A file with more than two channels has its loudness measured from a two-channel mix of it.
With an agent
Section titled “With an agent”normalize_clip names its own mode and doesn’t read the Normalize row. In Peak mode it can aim anywhere from −60 to 0 dBFS, and it reports what each clip measured, where it landed, and each skipped clip with its reason. See Tools: audio.